AI-powered one-click virtual fitting room for WooCommerce, Shopify, Prestashop
ShopifyWooCommerceLinkedIn
This low-code automation enables all eCommerce store visitors to upload a photo of themselves and virtually “try on” a garment in just a few clicks. With this workflow, WooCommerce, Prestashop, Shopify and more merchants can offer a cutting-edge “virtual try-on” feature with minimal development effort, enhancing customer engagement and reducing product returns. --- Key Advantages Zero-Coding, Visual Setup Build end-to-end e-commerce features with drag-and-drop nodes
About this workflow
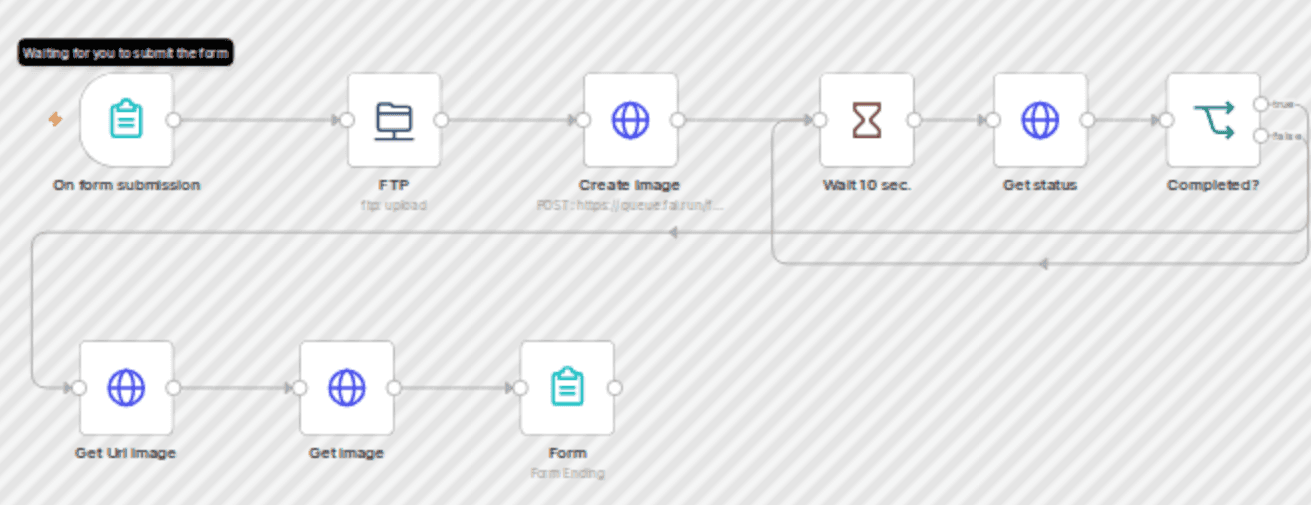
This low-code automation enables all eCommerce store visitors to upload a photo of themselves and virtually “try on” a garment in just a few clicks. With this workflow, WooCommerce, Prestashop, Shopify and more merchants can offer a cutting-edge “virtual try-on” feature with minimal development effort, enhancing customer engagement and reducing product returns. --- Key Advantages Zero-Coding, Visual Setup Build end-to-end e-commerce features with drag-and-drop nodes instead of custom backend code. Asynchronous, Scalable Processing Non-blocking “Wait” + “If” loop handles multi-second AI jobs gracefully, freeing up the workflow for other tasks. Dynamic Inputs & URLs Query strings (e.g. ?Product=IMAGEURL) allow you to embed the form on any product page and pass the garment image on the fly. Seamless User Experience Instant pop-up within your storefront and automatic redirect to the generated mock-up keeps shoppers engaged without page reloads. Easy Credential Management API keys, FTP credentials, and webhook IDs are all stored securely in n8n’s credential manager. --- How It Works 1. Form Submission: - A user submits a form with their name, an image of themselves ("Me"), and a hidden product image URL ("Product"). - The form is triggered via the On form submission node, which collects the input data. 2. Image Upload: - The uploaded image ("Me") is sent to an FTP server for temporary storage using the FTP node. The filename includes a timestamp to ensure uniqueness. 3. Virtual Try-on Request: - The Create Image node sends a POST request to the Fal.run API, providing: - The uploaded human image URL (from FTP). - The product image URL (from the hidden form field). - This generates a virtual try-on result. 4. Result Processing: - The workflow checks the status of the image generation (Get status node) in a loop (with a 10-second wait between checks) until it is marked as "COMPLETED." - Once ready, the final image URL is fetched (Get Url image node) and displayed to the user via a redirect (Form node). 5. User Experience: - The user is redirected to the generated try-on image, completing the process. --- Set Up Steps 1. API Key Setup: - Create an account and obtain an API key. - Configure the Create Image node with HTTP Header Authentication: - Name: Authorization - Value: Key YOURAPIKEY 2. FTP/S3 Configuration: - Set up an FTP server or S3 bucket to temporarily store uploaded user images. - Configure the FTP node with your FTP credentials and storage path. 3. Ecommerce Integration: - On your WooCommerce site, add a "Try On" button that opens the form in a pop-up. - Dynamically pass the product image URL as a query parameter: - Example: 4. Testing: - Verify the workflow by submitting a test form and ensuring the virtual try-on image is generated and displayed correctly. --- Need help customizing? Contact me for consulting and support or add me on Linkedin.
How to import this n8n workflow
- 1
Download the workflow JSON file after purchase.
- 2
Open n8n → click the menu → Import from File.
- 3
Select the downloaded JSON and import.
- 4
Set up credentials for each node that requires them.
- 5
Click Execute Workflow to test, then activate.
Setup guide
Setup guide included
Purchase to unlock the full step-by-step guide
Reviews
No reviews yet
Be the first to buy and share your experience.
Leave a review
Sign in to share your experience with this workflow.
Free
No ratings yet
Create a free account to purchase workflows.
- JSON blueprint — instant download
- Setup guide PDF included
- 5 downloads · valid 30 days
- Works with n8n
Free