Automate blog updates via Discord with GitHub and Gemini AI
agentdateTimeTooldiscorddiscordTriggergithubToollmChatGoogleGeminimemoryBufferWindow
Automate blog updates via Discord with GitHub and customizable AI chatbot > ⚠️ Disclaimer: This template uses the n8n-nodes-discord-trigger community node, which means it works only in self-hosted n8n instances.(works for both cloud and localhost) Who’s it for This workflow is designed for developers, bloggers, and technical writers who want a hands-free way to draft and publish blog posts directly from Discord. Instead of juggling multiple tools, you just send a message to your Discord b
About this workflow
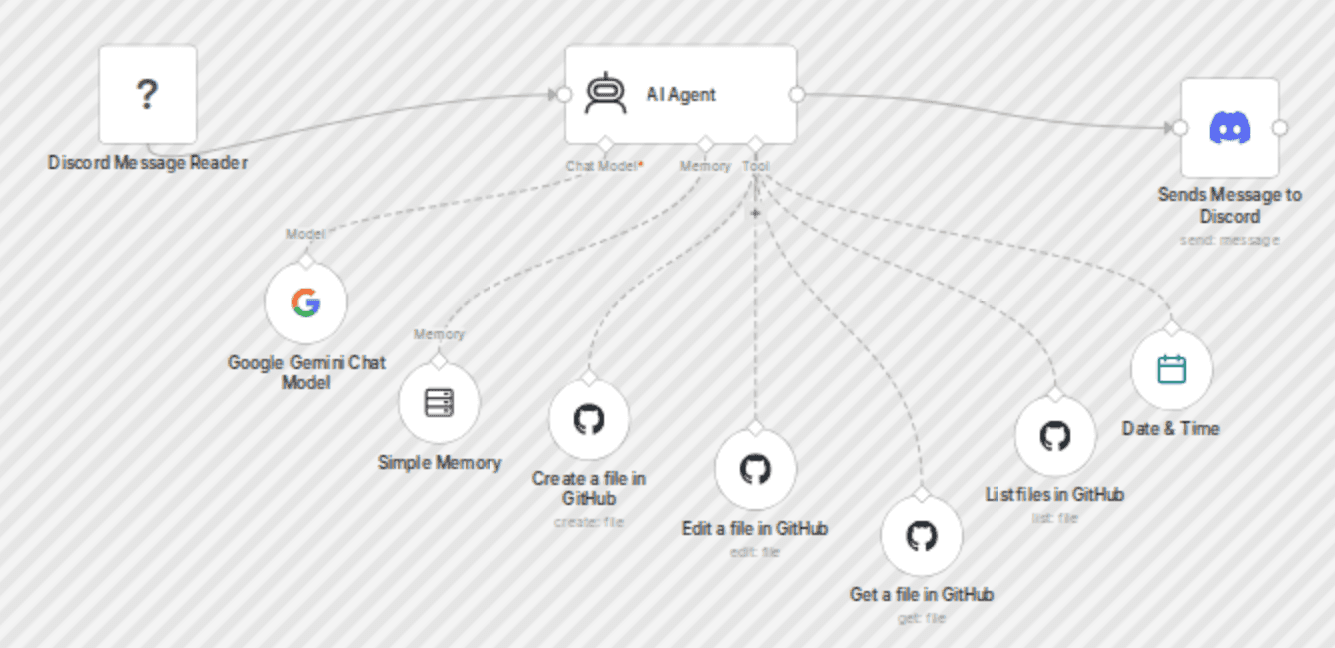
Automate blog updates via Discord with GitHub and customizable AI chatbot > ⚠️ Disclaimer: This template uses the n8n-nodes-discord-trigger community node, which means it works only in self-hosted n8n instances.(works for both cloud and localhost) Who’s it for This workflow is designed for developers, bloggers, and technical writers who want a hands-free way to draft and publish blog posts directly from Discord. Instead of juggling multiple tools, you just send a message to your Discord bot, and the workflow creates a properly formatted Markdown file in your GitHub repo. How it works - Listens for new messages in a Discord channel or DM using the Discord Trigger (community node). - Passes your message to an AI chatbot model (Google Gemini, OpenAI GPT, or any other connector you prefer) to draft or format the content. - Uses GitHub nodes to check existing files, read repo contents, and create new .md posts in the specified directory. - Adds the correct timestamp with the Date & Time node. - Sends a confirmation reply back to Discord(Regular Message Node). - Guardrails ensure it only creates new Markdown files in the correct folder, without overwriting or editing existing content. How to set up 1. Import the workflow (or download the file here BlogAutomationclean.json) into your self-hosted n8n. 2. Install the n8n-nodes-discord-trigger community node inside n8n workflow dashboard(click the link for the steps of setup). 3. Create credentials for: - Discord bot trigger from the community node - Discord bot send Message from the Regular Discord Message Node - GitHub (personal access token with repo permissions) - Your AI provider (Gemini, OpenAI, etc.) 4. Update the GitHub nodes with: - Owner → your GitHub username - Repo → your blog repo name - Path → target directory for new Markdown posts 5. Customize the AI agent’s system prompt to match your tone and workflow. (Default prompt included below.) 6. Test it in a private Discord channel before going live. Requirements - Self-hosted n8n instance(works both on cloud and localhost) - GitHub repository with write access - Discord bot credentials(BOTH ARE REQUIRED: COMMUNITY NODE FOR TRIGGER AND REGULAR NODE read below for reasoning) - AI model credentials (Gemini, OpenAI, or other supported provider) How to customize the workflow - Swap the AI model node for any provider you like: Gemini, OpenAI, or even a local LLM. - Adjust the prompt to enforce your blog style guide. - Add additional steps like auto-publishing, Slack notifications, or Notion syncs. - Modify the directory path or file naming rules to fit your project. Reason for Using The Community Discord Trigger Node and Regular Discord Message Node From Testing, the Community Discord node cannot send big messages(Has a Certain limit), while the Original/Regular Discord Message Node can send far beyond that amount which helps for viewing Files. Feel Free to use both trigger and Send Message from the community node if facing issues, it will still work flawless other than message limit Default Prompt markdown --- title: "The Title Provided by the User" date: "YYYY-MM-DD" --- [Well-structured blog content goes here. Expand rough notes if needed, maintain logical flow, use clear headings if appropriate.] Thanks for Reading! --- - Writing rules: Tone: Neutral, informative, lightly conversational — not too cheerful. Flow: Use line breaks for readability. Expansion: If notes are provided, polish and structure them. Modification: If asked, revise while preserving original meaning. File Naming: Generate a short kebab-case filename from the title (e.g., "Making My Own Java CLI-Based RPG!" → java-cli-rpg.md). File Creation vs Editing: If creating → Use the GitHub Create tool. If file already exists → Ask the user if they want to edit it. Store their response in Data Storage. If confirmation = yes → proceed with GitHub Edit tool. If no → cancel operation. Final Action: Confirm success to the user after creation or editing. Advanced Error Handling: "Resource Not Found" If the creategithubfile tool fails with "Resource not found": First Failure: Notify the user that the attempt failed. State the exact path used. Retry automatically once. Second Failure: If it fails again, explain that standard creation isn’t working. Suggest it may be a permissions issue. Await user instructions before proceeding further. ` Contact and Changes Feel Free To Contribute to it I do not own anything made here, everything was made by their respective owners Shout-out to katerlol for making the discord Node Trigger Contact me Here if you need any help!
How to import this n8n workflow
- 1
Download the workflow JSON file after purchase.
- 2
Open n8n → click the menu → Import from File.
- 3
Select the downloaded JSON and import.
- 4
Set up credentials for each node that requires them.
- 5
Click Execute Workflow to test, then activate.
Setup guide
Setup guide included
Purchase to unlock the full step-by-step guide
Reviews
No reviews yet
Be the first to buy and share your experience.
Leave a review
Sign in to share your experience with this workflow.
Free
No ratings yet
Create a free account to purchase workflows.
- JSON blueprint — instant download
- Setup guide PDF included
- 5 downloads · valid 30 days
- Works with n8n
Free