Build a RAG-powered AI assistant with OpenAI, Google Drive & Supabase Vector DB
OpenAIGoogle DriveGitHub
Target Audience This guide is designed for developers, data scientists, and AI enthusiasts who want to create intelligent chatbots capable of understanding and using custom data. Whether you are building a research assistant, a customer support bot, or an internal knowledge base tool, this workflow helps you integrate your own documents into an AI chat system. What Is RAG and Why Use It? Retrieval-Augmented Generation (RAG) is an AI architecture that combines information retrieval with
About this workflow
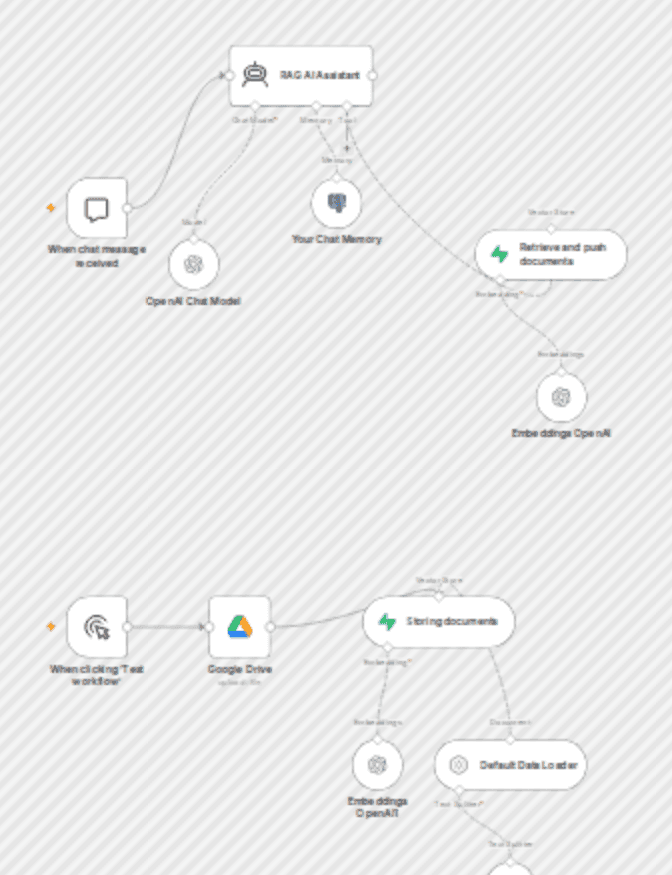
Target Audience This guide is designed for developers, data scientists, and AI enthusiasts who want to create intelligent chatbots capable of understanding and using custom data. Whether you are building a research assistant, a customer support bot, or an internal knowledge base tool, this workflow helps you integrate your own documents into an AI chat system. What Is RAG and Why Use It? Retrieval-Augmented Generation (RAG) is an AI architecture that combines information retrieval with text generation. Instead of relying solely on a model’s built-in knowledge, RAG retrieves relevant data from external sources—such as your uploaded documents—and feeds it into the AI’s reasoning process. This approach solves a major limitation of traditional language models: their inability to access or recall up-to-date or proprietary information. By using RAG, your chatbot can deliver accurate, context-aware answers drawn directly from your specific data. Use Case Example Consider a scenario where your organization has a collection of internal reports, manuals, or research documents. With RAG, your AI chatbot can answer detailed questions about these materials without exposing sensitive data externally. This setup is ideal for teams working in customer support, technical documentation, education, or data analysis. Workflow Overview Step 1: Upload Your Document Add your document to the Supabase Vector Store using the "Add Document" feature after downloading or linking it via Google Drive. Step 2: Data Retrieval The workflow retrieves and embeds your document’s content into the vector database for efficient search and retrieval. Step 3: AI Query Processing When you ask a question, the AI retrieves the most relevant context from the Supabase Vector Store based on semantic similarity. Step 4: Response Generation The AI combines the retrieved context with its generative capabilities to produce accurate, data-driven responses tailored to your input. Prerequisites Before setting up the workflow, ensure you have the following: A GitHub account A Supabase account A Google Drive document containing your data Basic understanding of APIs and environment configuration Setup Instructions Step 1: Create Accounts Create a GitHub account and clone the repository containing the workflow. Then, create a Supabase account and a new project to generate your API keys. Step 2: Prepare Your Data Upload your data to Google Drive and make it downloadable. Add the document to the Supabase Vector Store using the “Add Document” feature. Step 3: Configure the Environment Set your Supabase keys as environment variables in your workflow configuration. Step 4: Run the Workflow Execute the workflow to connect your document with the AI agent. Once configured, you can start chatting with the AI agent—your responses will now be powered by your own data.
How to import this n8n workflow
- 1
Download the workflow JSON file after purchase.
- 2
Open n8n → click the menu → Import from File.
- 3
Select the downloaded JSON and import.
- 4
Set up credentials for each node that requires them.
- 5
Click Execute Workflow to test, then activate.
Setup guide
Setup guide included
Purchase to unlock the full step-by-step guide
Reviews
No reviews yet
Be the first to buy and share your experience.
Leave a review
Sign in to share your experience with this workflow.
Free
No ratings yet
Create a free account to purchase workflows.
- JSON blueprint — instant download
- Setup guide PDF included
- 5 downloads · valid 30 days
- Works with n8n
Free