Conversing with data: transforming text into SQL queries and visual curves
Conversational Data Retrieval and Visualization Workflow This workflow enables users to interact with a PostgreSQL database using natural language. It translates text inputs into SQL queries, retrieves the corresponding data, and generates visualizations using QuickChart, facilitating seamless data analysis without manual query writing. Table of Contents - Pre-conditions and Requirements - Database Schema Setup - Step-by-Step Workflow Explanation - Customization Guide Pre-conditions and Requirem
About this workflow
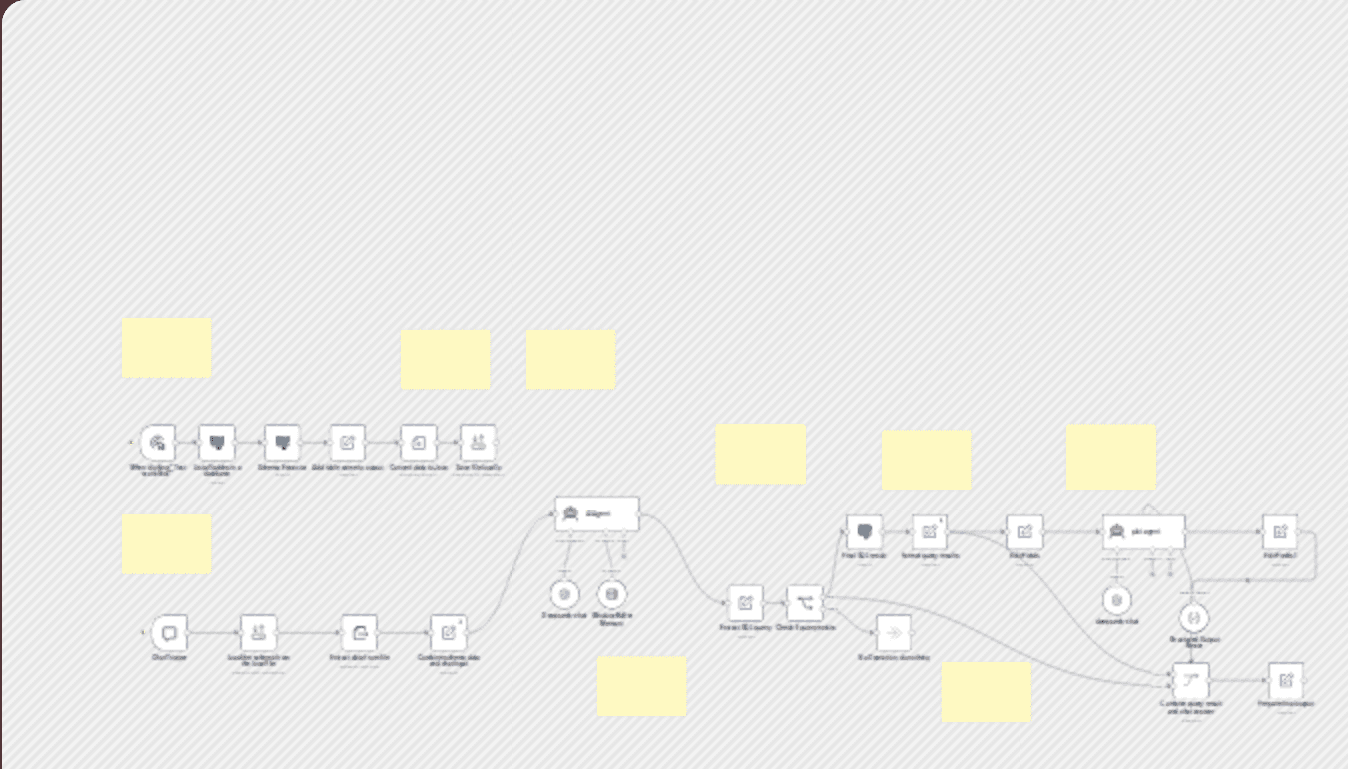
Conversational Data Retrieval and Visualization Workflow This workflow enables users to interact with a PostgreSQL database using natural language. It translates text inputs into SQL queries, retrieves the corresponding data, and generates visualizations using QuickChart, facilitating seamless data analysis without manual query writing. Table of Contents - Pre-conditions and Requirements - Database Schema Setup - Step-by-Step Workflow Explanation - Customization Guide Pre-conditions and Requirements 1. API Keys and Services Required To operate this workflow, access to the following services is necessary: - DeepSeek API: For converting natural language into SQL queries. - API Key: Obtain from your DeepSeek account. - QuickChart: For generating data visualizations. - Service URL: 2. n8n Instance Setup - n8n Installation: Install and run n8n using the Official Guide. - Credential Configuration: - DeepSeek API: Set up DeepSeek credentials in n8n by adding your API key. - PostgreSQL Database: - Local Database Access: If your PostgreSQL database is hosted locally and needs to be accessed over the internet (e.g., by n8n running on a different machine or in the cloud), you can expose it using ngrok: 1. Install ngrok: Download and install ngrok from ngrok.com. 2. Start ngrok Tunnel: Run the command ngrok tcp 5432 to expose your local PostgreSQL server. - This will provide a forwarding address like tcp://0.tcp.ngrok.io:12345 that can be used to connect to your local database remotely. 3. Update n8n Credentials: In n8n, configure the PostgreSQL node to use the ngrok forwarding address, ensuring remote access to your local database. Database Schema Setup Before initiating the workflow, ensure that the database schema is extracted and saved: 1. Extract Schema: Retrieve the database schema, including table names and column details. 2. Save Schema: Store the extracted schema in a JSON file for reference during query generation. Step-by-Step Workflow Explanation 1. User Input Handling - The workflow begins by receiving a natural language query from the user. 2. Schema Retrieval - Loads the previously saved database schema from the JSON file. 3. AI-Based SQL Generation - Combines the user's query with the database schema. - Utilizes the DeepSeek API to translate the natural language query into a SQL statement. 4. SQL Query Execution - Executes the generated SQL query against the PostgreSQL database. - Retrieves the data corresponding to the query. 5. Data Visualization - Formats the retrieved data into a structure compatible with QuickChart. - Sends the data to QuickChart to generate a visual representation. - Example: To create a bar chart, construct a URL with the chart configuration: This URL returns an image of the chart. 6. Response Delivery - Presents the generated visualizations and data insights to the user. Customization Guide Modifying the AI Model - Alternative AI Services: Replace DeepSeek with other AI models by adjusting the API call configurations in the workflow. Changing Visualization Services - Visualization Tools: Swap QuickChart with other visualization services by modifying the data processing and visualization steps. Expanding Database Support - Additional Databases: Adapt the workflow to support other databases (e.g., MySQL, MongoDB) by configuring the respective database credentials and query execution nodes. --- This workflow streamlines the process of data retrieval and visualization, allowing users to interact with their database using natural language, thereby enhancing accessibility and efficiency in data analysis. ---
How to import this n8n workflow
- 1
Download the workflow JSON file after purchase.
- 2
Open n8n → click the menu → Import from File.
- 3
Select the downloaded JSON and import.
- 4
Set up credentials for each node that requires them.
- 5
Click Execute Workflow to test, then activate.
Setup guide
Setup guide included
Purchase to unlock the full step-by-step guide
Reviews
No reviews yet
Be the first to buy and share your experience.
Leave a review
Sign in to share your experience with this workflow.
Free
No ratings yet
Create a free account to purchase workflows.
- JSON blueprint — instant download
- Setup guide PDF included
- 5 downloads · valid 30 days
- Works with n8n
Free