Email new leads from Google Sheets via Outlook on a schedule
NotionGoogle SheetsOutlook
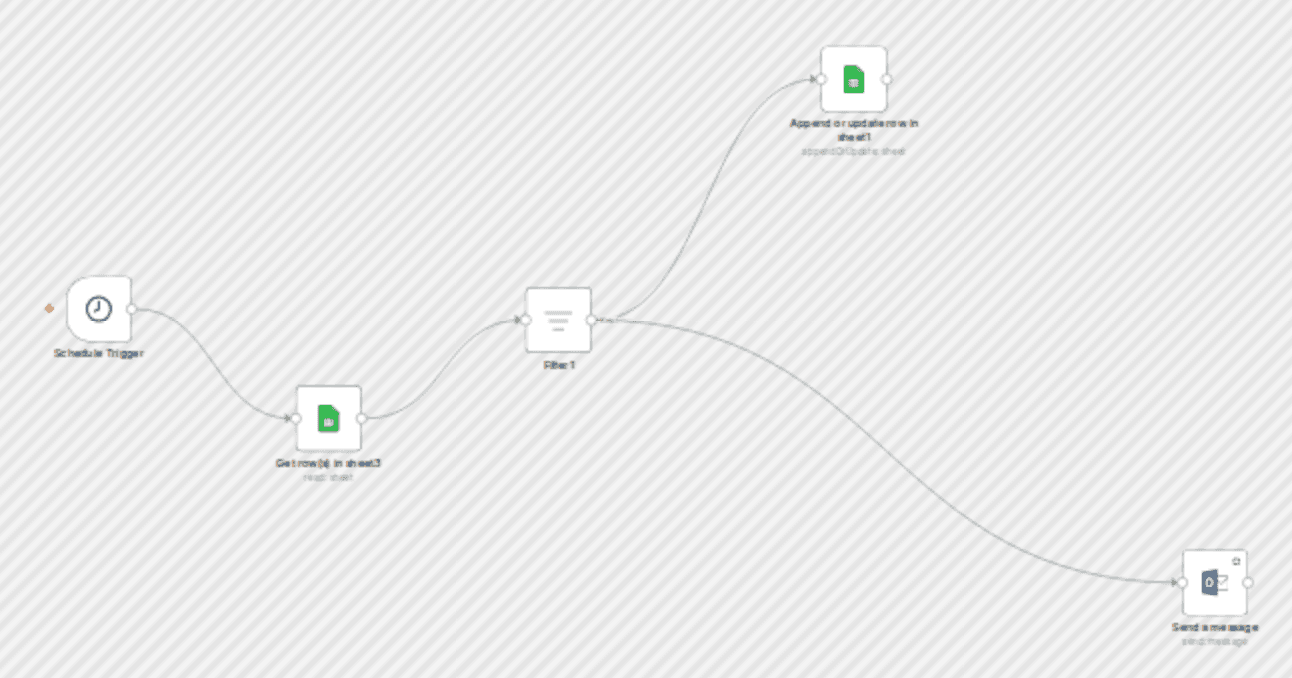
Send a templated outreach email to new leads in a Google Sheet on a daily schedule, then mark each lead as contacted so they won’t be emailed twice. Built with: Schedule Trigger → Google Sheets → Filter → Outlook Send Email → Google Sheets (append/update). --- Who’s it for - Teams that collect leads in Sheets and want automatic, once-per-lead outreach - Solo founders/consultants running simple top-of-funnel follow-ups - Anyone prototyping CRM-lite flows in n8n --- H
About this workflow
Send a templated outreach email to new leads in a Google Sheet on a daily schedule, then mark each lead as contacted so they won’t be emailed twice. Built with: Schedule Trigger → Google Sheets → Filter → Outlook Send Email → Google Sheets (append/update). --- Who’s it for - Teams that collect leads in Sheets and want automatic, once-per-lead outreach - Solo founders/consultants running simple top-of-funnel follow-ups - Anyone prototyping CRM-lite flows in n8n --- How it works / What it does 1. Schedule Trigger runs daily (e.g., 09:00). 2. Get rows (Google Sheets) pulls leads from your sheet. 3. Filter keeps only rows where Contacted is empty. 4. Outlook – Send a message emails each remaining lead (to = {{$json.Email}}). 5. Google Sheets (appendOrUpdate) writes back Contacted = Yes (match on Email) to prevent re-sending. --- How to set up 1) Google Sheets (OAuth2) - In n8n → Credentials → New → Google Sheets (OAuth2), sign in and grant access. - In Get rows: select your Lead Source sheet (e.g., “New Leads”). - In Append/Update: select the sheet you want to mark as contacted (can be the same sheet or a CRM sheet). - Make sure your sheet has at least: Email, Contacted (blank for new). 2) Outlook (Microsoft Graph) OAuth2 - n8n Cloud (quick connect): - In Credentials → New → Microsoft Outlook OAuth2, choose Connect, sign in with your Microsoft account, and accept permissions. - Self-hosted (Azure App Registration): 1) Azure Portal → App registrations → New registration. 2) Add redirect URL: 3) API permissions (Delegated): offlineaccess, Mail.Send, User.Read. Grant admin consent if required. 4) Create a Client secret; copy Application (client) ID and Directory (tenant) ID. 5) In n8n, create Microsoft Outlook OAuth2 credential with those values and scopes: offlineaccess Mail.Send openid email profile. - In the Send a message node, select that credential and keep To mapped to {{$json.Email}}. - Customize Subject and Body to your brand (default provided). --- Requirements - A Google Sheet of leads with an Email column (and an optional Contacted column). - A Microsoft account with permission to send mail via Microsoft Graph (Outlook). --- How to customize the workflow - Email content: Edit subject/body (add variables like {{$json.FirstName}}). - Send window: Change Schedule Trigger time/interval. - Idempotency: Use the same sheet for read+write (match on Email) or separate source/CRM sheets. - Logging: Add a Sheet or Notion append step after send for an audit trail. --- Security & best practices - No hardcoded secrets: Always use OAuth2 credentials (Sheets & Outlook). - Sanitize PII: If publishing, remove real spreadsheet IDs/URLs and personal emails/phone numbers. - Sticky notes are mandatory: Add a yellow sticky note in the workflow with this description and a short setup checklist. Use neutral sticky notes for per-node tips. --- Troubleshooting - No emails sent: Ensure Contacted is blank for new rows and the Filter checks “is empty.” - Auth errors (Outlook): Reconnect credential; confirm Graph scopes and tenant consent. - Sheets errors: Re-select spreadsheet/tab; verify headers (Email, Contacted). - Duplicates: Confirm Append/Update uses matching column = Email. --- Tags & category Category: Sales & CRM Tags: outreach, follow-up, google-sheets, outlook, schedule, dedupe, cold-email --- Changelog v1.0.0 — Initial release: scheduled outreach, Outlook email, de-dupe via Contacted = Yes. --- Contact Need help customizing (personalization, rate-limits, CRM sync, bounce checks)? - 📧 rbreen@ynteractive.com - 🔗 Robert Breen — - 🌐 ynteractive.com —
How to import this n8n workflow
- 1
Download the workflow JSON file after purchase.
- 2
Open n8n → click the menu → Import from File.
- 3
Select the downloaded JSON and import.
- 4
Set up credentials for each node that requires them.
- 5
Click Execute Workflow to test, then activate.
Setup guide
Setup guide included
Purchase to unlock the full step-by-step guide
Reviews
No reviews yet
Be the first to buy and share your experience.
Leave a review
Sign in to share your experience with this workflow.
Free
No ratings yet
Create a free account to purchase workflows.
- JSON blueprint — instant download
- Setup guide PDF included
- 5 downloads · valid 30 days
- Works with n8n
Free