ETL: Extract and Parse Revit Model Data to Structured Excel
GitHub
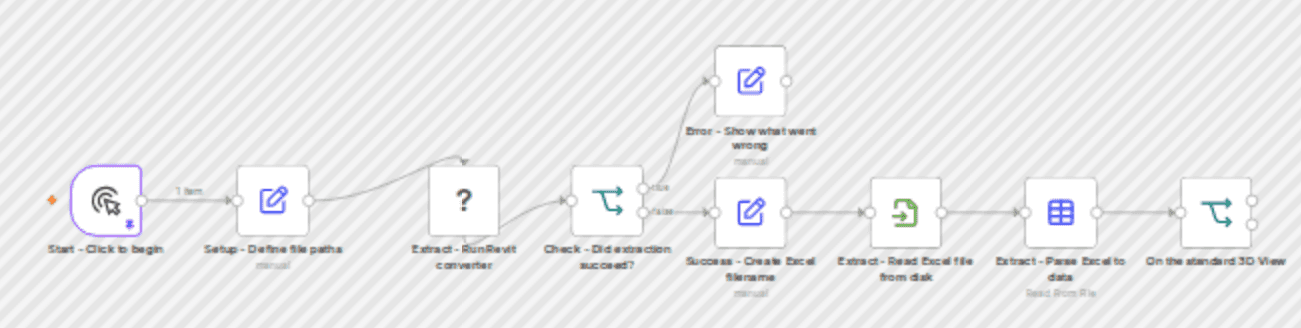
Convert a Revit model to Excel and parse it into structured items ready for downstream ETL. This minimal template runs a local RvtExporter.exe, checks success, derives the expected rvt.xlsx filename, reads it from disk, and parses it to data items in n8n. What it does 1. Setup: define pathtorevitconverter and revitfile. 2. Run converter: execute RvtExporter.exe "<converter>" "<revitfile>" (writes rvt.xlsx next to the RVT). 3. Check success
About this workflow
Convert a Revit model to Excel and parse it into structured items ready for downstream ETL. This minimal template runs a local RvtExporter.exe, checks success, derives the expected rvt.xlsx filename, reads it from disk, and parses it to data items in n8n. What it does 1. Setup: define pathtorevitconverter and revitfile. 2. Run converter: execute RvtExporter.exe "<converter>" "<revitfile>" (writes rvt.xlsx next to the RVT). 3. Check success: branch on converter error output. 4. Read Excel: compute <revitfile> → rvt.xlsx and read it from disk. 5. Parse: convert the workbook into structured items (rows → items). Prerequisites - Windows host (local executable and filesystem paths). - DDC Revit toolkit installed: C:\\DDCConverterRevit\\datadrivenlibs\\RvtExporter.exe. - A local .rvt you can read; the converter will write rvt.xlsx next to it. How to use 1. Import this JSON into n8n. 2. Open “Setup – Define file paths” and set: - pathtorevitconverter: C:\\DDCConverterRevit\\datadrivenlibs\\RvtExporter.exe - revitfile: e.g., C:\\SampleProjects\\yourproject.rvt 3. Run Manual Trigger. 4. On success, the flow will read rvt.xlsx and emit parsed items. Outputs - On disk: <YourProject>rvt.xlsx (created by the converter). - In n8n: parsed rows as items, ready for Transform/Load phases. Notes & tips - If your converter writes the Excel to a different folder/file name, update the “Success – Create Excel filename” node to point to the actual path. - Ensure write permissions in the project folder and avoid non-ASCII characters in paths when possible. - This template is purposefully minimal (Extract-only). Chain it with your own Transform/Load steps. Categories Data Extraction · Files & Storage · ETL · CAD/BIM Tags cad-bim, revit, ifc, dwg, extract, xlsx, etl Author DataDrivenConstruction.io info@datadrivenconstruction.io Consulting and Training We work with leading construction, engineering, consulting agencies and technology firms around the world to help them implement open data principles, automate CAD/BIM processing and build robust ETL pipelines. If you would like to test this solution with your own data, or are interested in adapting the workflow to real project tasks, feel free to contact us. Docs & Issues: Full Readme on GitHub
How to import this n8n workflow
- 1
Download the workflow JSON file after purchase.
- 2
Open n8n → click the menu → Import from File.
- 3
Select the downloaded JSON and import.
- 4
Set up credentials for each node that requires them.
- 5
Click Execute Workflow to test, then activate.
Setup guide
Setup guide included
Purchase to unlock the full step-by-step guide
Reviews
No reviews yet
Be the first to buy and share your experience.
Leave a review
Sign in to share your experience with this workflow.
Free
No ratings yet
Create a free account to purchase workflows.
- JSON blueprint — instant download
- Setup guide PDF included
- 5 downloads · valid 30 days
- Works with n8n
Free