Facebook Messenger Chatbot That Learns From Your Documents
OpenAIGitHubFacebook
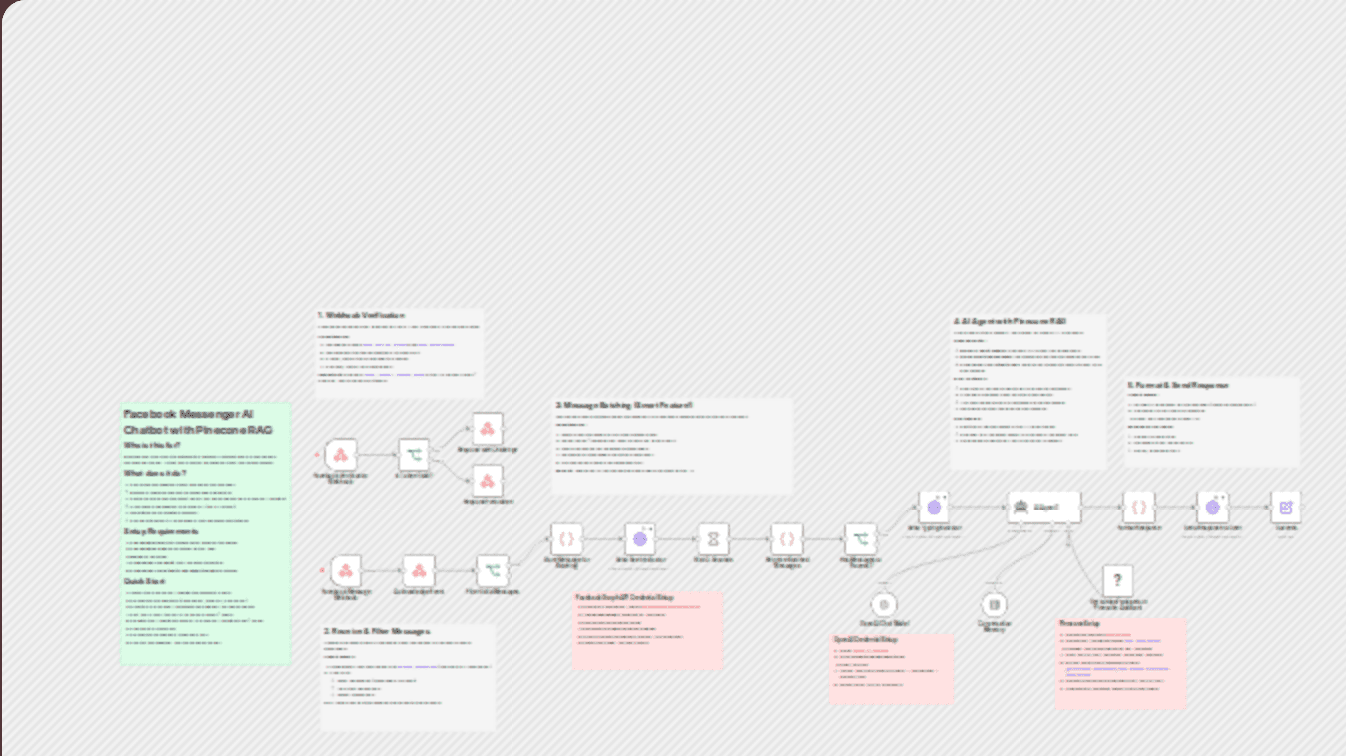
Quickstart Guide: Facebook Messenger Chatbot with Pinecone RAG Step-by-step instructions to get this workflow running in n8n. --- Prerequisites - Self-hosted n8n instance (v1.113.0+ recommended) - Community nodes enabled in n8n - Facebook Page (you must be an admin) - OpenAI account - Pinecone account (free Starter plan works) --- Workflow Architecture This workflow uses two webhooks with the same URL path but different HTTP methods: | Webhook | Method | Purpose | |---------|--------|---------|
About this workflow
Quickstart Guide: Facebook Messenger Chatbot with Pinecone RAG Step-by-step instructions to get this workflow running in n8n. --- Prerequisites - Self-hosted n8n instance (v1.113.0+ recommended) - Community nodes enabled in n8n - Facebook Page (you must be an admin) - OpenAI account - Pinecone account (free Starter plan works) --- Workflow Architecture This workflow uses two webhooks with the same URL path but different HTTP methods: | Webhook | Method | Purpose | |---------|--------|---------| | Facebook Verification Webhook | GET | Handles Facebook's webhook verification | | Facebook Message Webhook | POST | Receives incoming messages | Both webhooks share the same URL: n8n automatically routes requests based on HTTP method: - GET requests → Verification flow - POST requests → Message processing flow RAG Enhancement --- Step 1: Install the Pinecone Assistant Community Node The Pinecone Assistant node is a community node that must be installed separately. 1. In n8n, go to Settings → Community Nodes 2. Click Install a community node 3. Enter: @pinecone-database/n8n-nodes-pinecone-assistant 4. Click Install 5. Restart n8n if prompted > Note: Community nodes must be enabled in your n8n instance. For Docker, set N8NCOMMUNITYPACKAGESALLOWINSTALL=true. --- Step 2: Create Pinecone Account & Assistant 2.1 Create Pinecone Account 1. Go to Pinecone 2. Sign up for a free account (Starter plan includes 100 files per assistant) 3. Complete the onboarding 2.2 Create an Assistant 1. In the Pinecone console, go to Assistants 2. Click Create Assistant 3. Name it n8n-assistant (or choose your own name) 4. Select your preferred region 5. Click Create 2.3 Upload Your Documents 1. Click on your newly created assistant 2. Go to the Files tab 3. Click Upload Files 4. Upload your documents (PDFs, text files, etc.) 5. Wait for processing to complete 2.4 Get Your Pinecone API Key 1. In the Pinecone console, click on your profile/account 2. Go to API Keys 3. Copy your API key (or create a new one) --- Step 3: Get Your OpenAI API Key 1. Go to OpenAI Platform 2. Sign in with your OpenAI account 3. Click Create new secret key 4. Copy and save the API key --- Step 4: Create Facebook App & Get Page Access Token 4.1 Create Facebook App 1. Go to Facebook Developers 2. Click My Apps → Create App 3. Select Other → Next 4. Select Business → Next 5. Enter app name and contact email 6. Click Create App 4.2 Add Messenger Product 1. In your app dashboard, scroll to Add products to your app 2. Find Messenger and click Set up 4.3 Connect Your Facebook Page 1. In Messenger settings, find Access Tokens section 2. Click Add or Remove Pages 3. Select your Facebook Page and grant permissions 4. Click Done 4.4 Generate Page Access Token 1. Back in Messenger settings, find your page in the list 2. Click Generate Token 3. Copy and save the token --- Step 5: Create Your Verify Token The verify token is a secret string for Facebook webhook verification. 1. Create a random string (e.g., my-secret-token-12345) 2. Save this value - you'll need it in Steps 7 and 10 --- Step 6: Create n8n Credentials 6.1 Pinecone Credential 1. In n8n, go to Credentials → Add Credential 2. Search for "Pinecone" (or "Pinecone API") 3. Configure: - Name: Pinecone API - API Key: Paste your Pinecone API key from Step 2.4 4. Click Save 6.2 OpenAI API Credential 1. In n8n, go to Credentials → Add Credential 2. Search for "OpenAI API" 3. Configure: - Name: OpenAI API - API Key: Paste your OpenAI API key from Step 3 4. Click Save 6.3 Facebook Graph API Credential 1. In n8n, go to Credentials → Add Credential 2. Search for "Facebook Graph API" 3. Configure: - Name: Facebook Page Access Token - Access Token: Paste your Page Access Token from Step 4.4 4. Click Save --- Step 7: Import the Workflow 1. In n8n, click Add Workflow → Import from File 2. Select the workflow.json file from this folder 3. The workflow will open in the editor 7.1 Configure the Verify Token 1. Find the "Is Token Valid?" node 2. Click on the node to open its settings 3. In the conditions, find Value 2 that shows YOURVERIFYTOKENHERE 4. Replace it with your verify token from Step 5 7.2 Configure the Pinecone Assistant Name 1. Find the "Get context snippets in Pinecone Assistant" node 2. Click on the node to open its settings 3. Change Assistant Name from n8n-assistant to your actual assistant name (from Step 2.2) --- Step 8: Connect Credentials to Nodes 8.1 Connect Facebook Credential Update these 3 nodes with your Facebook credential: 1. Click on "Send Seen Indicator" → Select your Facebook Page Access Token credential 2. Click on "Send Typing Indicator" → Select your Facebook Page Access Token credential 3. Click on "Send Response to User" → Select your Facebook Page Access Token credential 8.2 Connect OpenAI Credential 1. Click on "OpenAI Chat Model" → Select your OpenAI API credential 8.3 Connect Pinecone Credential 1. Click on "Get context snippets in Pinecone Assistant" → Select your Pinecone API credential --- Step 9: Publish the Workflow 1. Click Save to save the workflow 2. Click the Publish button to make the workflow live 3. Copy the webhook URL (e.g., --- Step 10: Configure Facebook Webhook 1. Go to Facebook Developers → Your App → Messenger Settings 2. Find Webhooks section 3. Click Add Callback URL 4. Enter: - Callback URL: Your n8n webhook URL from Step 9 - Verify Token: Same value from Step 5 5. Click Verify and Save 6. After verification, subscribe to webhook fields: - messages (required) - messagingpostbacks (recommended) --- Step 11: Test Your Chatbot 11.1 Add Test Users (if needed) With Standard Access, only users with app roles can message the bot: 1. Go to your Facebook App → App Roles → Roles 2. Add users as Testers 3. Those users must accept the invitation 11.2 Send a Test Message 1. Open Facebook Messenger 2. Search for your Facebook Page 3. Try these test messages: - "Hello!" - Should get a friendly greeting - "What information do you have?" - Should search your documents - "Tell me about [topic in your docs]" - Should return relevant information with context --- How Pinecone RAG Works --- Troubleshooting | Problem | Solution | |---------|----------| | "Pinecone Assistant Tool" not found | Ensure community node is installed (Step 1) | | "No relevant information found" | Upload more documents to your Pinecone Assistant | | Webhook verification fails | Check verify token matches in n8n and Facebook | | No response from bot | Check n8n execution logs for errors | | "Error validating access token" | Regenerate Page Access Token in Facebook | | AI Agent not using Pinecone tool | After import, open the "AI Agent1" node, make a small edit to the system message (e.g., add a space), and save. This re-initializes the tool bindings. | --- Customization Change the AI Behavior Edit the "AI Agent1" node's system message to: - Adjust how it cites sources - Change personality/tone - Add specific instructions for your use case Change the Assistant Update the "Get context snippets in Pinecone Assistant" node to use a different assistant name. Adjust Response Length The workflow truncates responses to 1900 characters for Messenger. Edit the "Format Response" node to change this. --- Resources - Pinecone Assistant Documentation - Pinecone Assistant n8n Node (GitHub) - Facebook Messenger Platform - OpenAI API Documentation - n8n Documentation
How to import this n8n workflow
- 1
Download the workflow JSON file after purchase.
- 2
Open n8n → click the menu → Import from File.
- 3
Select the downloaded JSON and import.
- 4
Set up credentials for each node that requires them.
- 5
Click Execute Workflow to test, then activate.
Setup guide
Setup guide included
Purchase to unlock the full step-by-step guide
Reviews
No reviews yet
Be the first to buy and share your experience.
Leave a review
Sign in to share your experience with this workflow.
Free
No ratings yet
Create a free account to purchase workflows.
- JSON blueprint — instant download
- Setup guide PDF included
- 5 downloads · valid 30 days
- Works with n8n
Free