Google Sheets send SMS with Twilio - bulk SMS automation simplified!
Google SheetsTwilioLinkedIn
Video Introduction []( Want to automate your inbox or need a custom workflow? 📞 Book a Call | 💬 DM me on Linkedin --- Overview This workflow automates sending personalized SMS messages directly from a Google Sheet using Twilio. Simply update a row's status to "To send" and the workflow automatically sends the text message, then updates the status to "Success" or "Error" based on delivery results. Perfect for event reminders, bulk notifications, appointment confirmations, or any scenario where yo
About this workflow
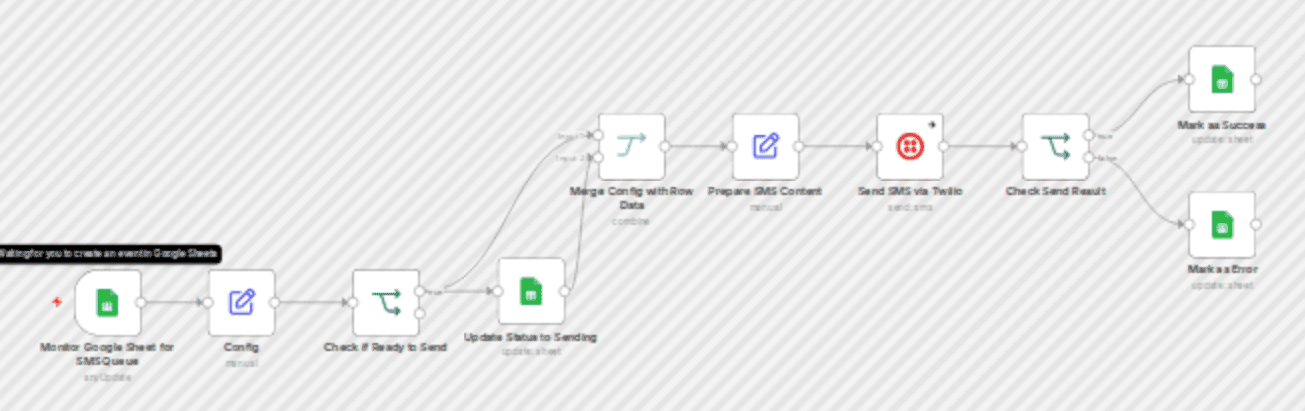
Video Introduction []( Want to automate your inbox or need a custom workflow? 📞 Book a Call | 💬 DM me on Linkedin --- Overview This workflow automates sending personalized SMS messages directly from a Google Sheet using Twilio. Simply update a row's status to "To send" and the workflow automatically sends the text message, then updates the status to "Success" or "Error" based on delivery results. Perfect for event reminders, bulk notifications, appointment confirmations, or any scenario where you need to send customized messages to multiple recipients. Key Features - Simple trigger mechanism: Change the status column to "To send" to queue messages - Personalization support: Use [First Name] and [Last Name] placeholders in message templates - Automatic status tracking: The workflow updates your spreadsheet with delivery results - Error handling: Failed deliveries are clearly marked, making it easy to identify issues like invalid phone numbers - Runs every minute: The workflow polls your sheet continuously when active Setup Instructions Step 1: Copy the Template Spreadsheet Make a copy of the Google Sheets template by going to File → Make a copy. You must use your own copy so the workflow has permission to update status values. Step 2: Connect Your Accounts 1. Google Sheets: Add your Google account credentials to the 'Monitor Google Sheet for SMS Queue' trigger node 2. Twilio: Sign up for a free Twilio account (trial works for testing). From your Twilio dashboard, get your Account SID, Auth Token, and Twilio phone number, then add these credentials to the 'Send SMS via Twilio' node Step 3: Configure the Workflow In the Config node, update: - sheeturl: Paste the URL of your copied Google Sheet - fromnumber: Enter your Twilio phone number (include country code, e.g., +1234567890) Step 4: Activate and Test Activate the workflow using the toggle in the top right corner. Add a row to your sheet with the required information (ID, First Name, Phone Number, Message Template) and set the Status to "To send". Within one minute, the workflow will process the message and update the status accordingly.
How to import this n8n workflow
- 1
Download the workflow JSON file after purchase.
- 2
Open n8n → click the menu → Import from File.
- 3
Select the downloaded JSON and import.
- 4
Set up credentials for each node that requires them.
- 5
Click Execute Workflow to test, then activate.
Setup guide
Setup guide included
Purchase to unlock the full step-by-step guide
Reviews
No reviews yet
Be the first to buy and share your experience.
Leave a review
Sign in to share your experience with this workflow.
Free
No ratings yet
Create a free account to purchase workflows.
- JSON blueprint — instant download
- Setup guide PDF included
- 5 downloads · valid 30 days
- Works with n8n
Free