Manage Odoo CRM with natural language using OpenAI and MCP Server
OpenAI
Odoo CRM MCP Server Workflow 📖 Overview This workflow connects an AI Agent with Odoo CRM using the Model Context Protocol (MCP). It allows users to manage CRM data in Odoo through natural language chat commands. The assistant interprets the user’s request, selects the appropriate Odoo action, and executes it seamlessly. 🔹 Key Features - Contacts Management: Create, update, delete, and retrieve contacts. - Opportunities Management: Create, update, delete, and retrieve opportunities. - Notes
About this workflow
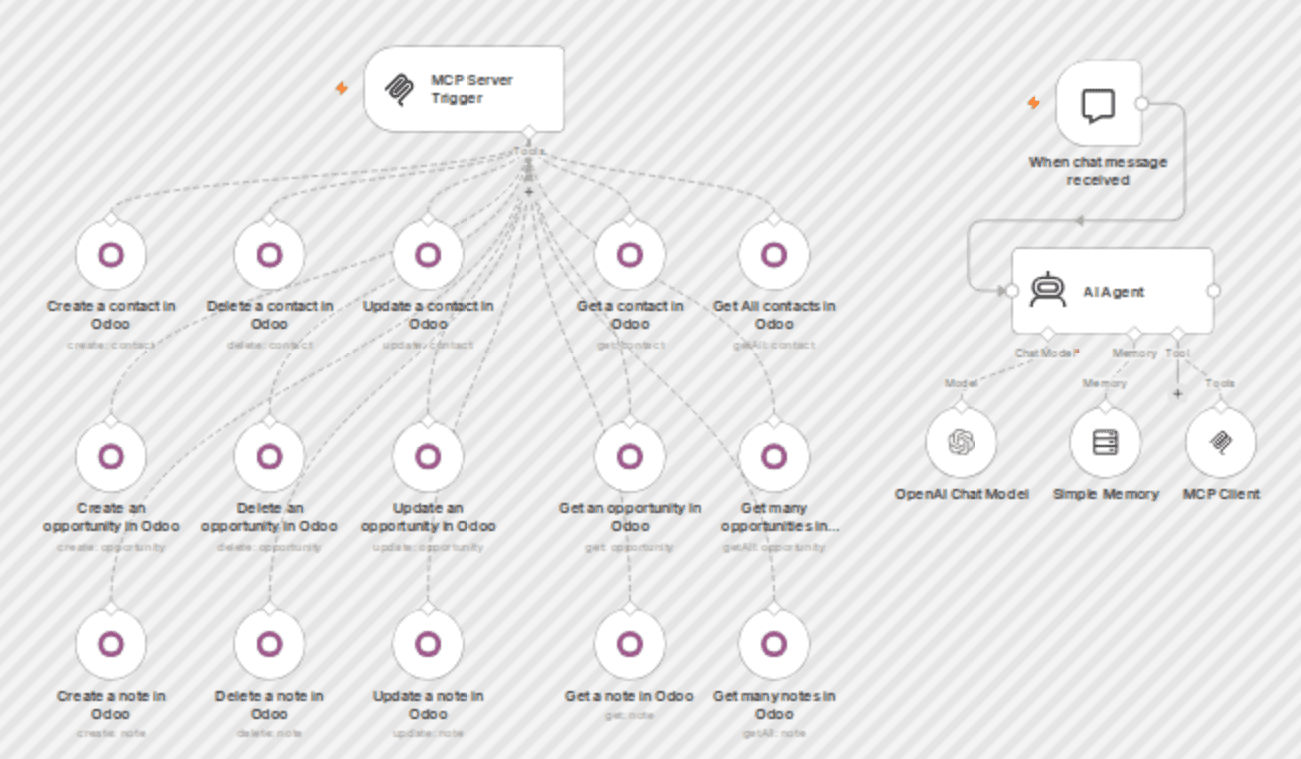
Odoo CRM MCP Server Workflow 📖 Overview This workflow connects an AI Agent with Odoo CRM using the Model Context Protocol (MCP). It allows users to manage CRM data in Odoo through natural language chat commands. The assistant interprets the user’s request, selects the appropriate Odoo action, and executes it seamlessly. 🔹 Key Features - Contacts Management: Create, update, delete, and retrieve contacts. - Opportunities Management: Create, update, delete, and retrieve opportunities. - Notes Management: Create, update, delete, and retrieve notes. - Conversational AI Agent: Understands natural language and maps requests to Odoo actions. - Model Used: OpenAI Chat Model. This makes it easy for end-users to interact with Odoo CRM without needing technical commands—just plain language instructions. --- ▶️ Demo Video Watch the full demo here: 👉 YouTube Demo Video --- ⚙️ Setup Guide Follow these steps to set up and run the workflow: 1. Prerequisites - An Odoo instance configured with CRM enabled. - An n8n or automation platform account where MCP workflows are supported. - An OpenAI API key with access to GPT models. - MCP Server installed and running. 2. Import the Workflow 1. Download the provided workflow JSON file. 2. In your automation platform (n8n, Langflow, or other MCP-enabled tool), choose Import Workflow. 3. Select the JSON file and confirm. 3. Configure MCP Server 1. Go to your MCP Server Trigger node in the workflow. 2. Configure it to connect with your Odoo instance. - Set API endpoint. - Provide authentication credentials (API key). 3. Test the connection to ensure the MCP server can reach Odoo. 4. Configure the OpenAI Model 1. Select the OpenAI Chat Model node in the workflow. 2. Enter your OpenAI API Key. 3. Choose the model (e.g., gpt-5 or gpt-5-mini). 5. AI Agent Setup - The AI Agent node links the Chat Model, Memory, and MCP Client. - Ensure the MCP Client is mapped to the correct Odoo tools (Contacts, Opportunities, Notes). - The System Prompt defines assistant behavior—use the tailored system prompt provided earlier. 6. Activate and Test 1. Turn the workflow ON (toggle Active). 2. Open chat and type: - "Create a contact named John Doe with email john@example.com." - "Show me all opportunities." - "Add a note to John Doe saying 'Follow-up scheduled for Friday'." 3. Verify the results in your Odoo CRM. --- ✅ Next Steps - Extend functionality with Tasks, Stages, Companies, and Communication Logs for a complete CRM experience. - Add confirmation prompts for destructive actions (delete contact/opportunity/note). - Customize the AI Agent’s system prompt for your organization’s workflows. ---
How to import this n8n workflow
- 1
Download the workflow JSON file after purchase.
- 2
Open n8n → click the menu → Import from File.
- 3
Select the downloaded JSON and import.
- 4
Set up credentials for each node that requires them.
- 5
Click Execute Workflow to test, then activate.
Setup guide
Setup guide included
Purchase to unlock the full step-by-step guide
Reviews
No reviews yet
Be the first to buy and share your experience.
Leave a review
Sign in to share your experience with this workflow.
Free
No ratings yet
Create a free account to purchase workflows.
- JSON blueprint — instant download
- Setup guide PDF included
- 5 downloads · valid 30 days
- Works with n8n
Free