Schedule appointments from a booking form with Google Calendar and Gmail
GmailGoogle Calendar
How it works This workflow creates a complete appointment booking system — no external scheduling tools needed. It serves a styled HTML booking form via webhook, checks your Google Calendar for availability, and lets visitors pick an open 30-minute slot. On submission, it creates a calendar event, sends a confirmation email via Gmail, and shows a success page. - A GET webhook serves the booking page, which reads your Google Calendar to show only open time slots for the next 30 days - Visito
About this workflow
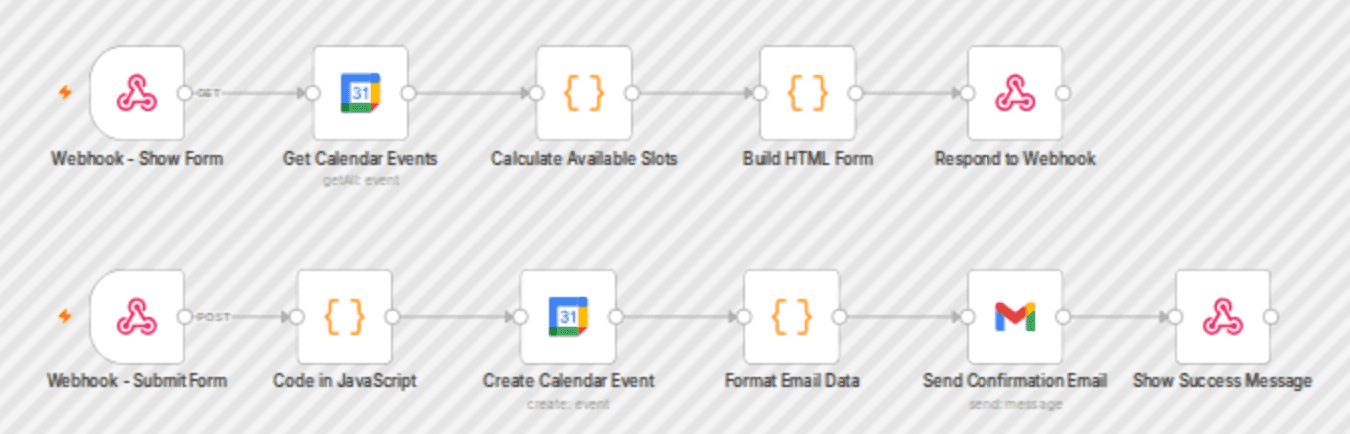
How it works This workflow creates a complete appointment booking system — no external scheduling tools needed. It serves a styled HTML booking form via webhook, checks your Google Calendar for availability, and lets visitors pick an open 30-minute slot. On submission, it creates a calendar event, sends a confirmation email via Gmail, and shows a success page. - A GET webhook serves the booking page, which reads your Google Calendar to show only open time slots for the next 30 days - Visitors pick a date/time, fill in their name, email, and an optional message, then submit - A POST webhook receives the form, calculates the end time, creates a Google Calendar event, and sends a styled HTML confirmation email with an "Add to Calendar" link - The visitor sees a branded success page confirming their booking Set up steps 1. Google Calendar OAuth2 — Connect your Google account with Calendar read/write access. Takes 5 minutes if you already have OAuth credentials in Google Cloud Console. 2. Gmail OAuth2 — Connect your Gmail account for sending confirmation emails. Can reuse the same Google OAuth app. 3. Configure your availability — In the "Calculate Available Slots" node, adjust workingDays (default: Mon–Fri), startHour/endHour (default: 9 AM–2 PM), slotDuration (default: 30 min), and the timezone offset (default: +02:00 for EET). 4. Activate the workflow — The booking form will be live at your n8n instance's webhook URL: your-n8n-url/webhook/booking 5. Optional: Customize branding — Edit the HTML/CSS in the "Build HTML Form" and "Show Success Message" nodes to match your brand colors and copy.
How to import this n8n workflow
- 1
Download the workflow JSON file after purchase.
- 2
Open n8n → click the menu → Import from File.
- 3
Select the downloaded JSON and import.
- 4
Set up credentials for each node that requires them.
- 5
Click Execute Workflow to test, then activate.
Setup guide
Setup guide included
Purchase to unlock the full step-by-step guide
Reviews
No reviews yet
Be the first to buy and share your experience.
Leave a review
Sign in to share your experience with this workflow.
Free
No ratings yet
Create a free account to purchase workflows.
- JSON blueprint — instant download
- Setup guide PDF included
- 5 downloads · valid 30 days
- Works with n8n
Free